Website Visitor ID X-Ray Pixel is an app created by Customers.ai that allows you to capture leads from anonymous website visitors, and build them into your marketing and advertising activities. You can find it in the Semrush App Center.
The Benefits of Website Visitor ID X-Ray Pixel
You can use Website Visitor ID X-Ray Pixel to:
- Turn up to 20% of your website visitors into email contacts that would have otherwise been missed
- Add new contacts to your CRM or Google Sheets to broaden the reach of your marketing and advertising, or add them to other platforms with Webhooks
- Upload new audiences to Facebook and Google for paid retargeting and lookalike audiences—plus recover pre-iOS14 audiences
- Suppress contacts to ensure you don’t capture any email addresses you already know or don’t want
- Gather leads from multiple sites at once, whether for your clients or range of brands
Pricing
A subscription to Website Visitor ID X-Ray Pixel costs $99 per month, which includes 150 leads. In-app purchases are available to top up your leads by 150 ($99/month) or 400 ($250/month) at a time—unused leads don’t expire, so your total will update accordingly after each top-up.
You will get 50 free contacts to try out the Website Visitor ID X-Ray Pixel app before subscribing.
What is Included in Website Visitor ID X-Ray Pixel?
The app contains six main menu items:
- Dashboard: Use the calculator to estimate lead capture and potential revenue for your website, and, after setup, get an overview of your lead generation via X-Ray
- Leads: See your leads as they come in and export them for additional filtering in a .CSV file
- Integrations: Manage your integrations with Google Sheets and JSON Webhooks to feed leads into your system
- Suppression List: Define the leads you don’t want with a limitless ‘do not include’ list
- Script Installation: Install the pixel’s script on your website, and test the connection at any time
- Plan & Billing: Access your plan details and limits, and purchase additional leads
How to Use Website Visitor ID X-Ray Pixel to Generate Leads
Step 1: Calculate your estimated lost leads and revenue
The first page you will come to is the Dashboard—this is where you can enter your domain into the calculator to get an estimate of how many leads you might be losing according to your traffic levels (using Semrush Traffic Analytics data).

Enter your URL and click “Get My Website Grade” to run the calculator. The next screen will give you an “abandoned website visitors report,” where you can see the app’s estimates for lost leads and revenue according to your recent traffic levels.
Estimates are based on an analysis of the tool’s capture rate using Semrush Traffic Analytics data. Abandoned website visitors are users who have left a cart behind without buying a product, or left the site without entering their email into any pop-up boxes you may have attached to your site.

The Current Email Capture Rate of 2% is based on the industry average, while the Email List Growth With X-Ray represents the 20% of website visitors that the tool can identify and obtain contact details for to pass on to you.
The tool’s estimated Additional Emails per Month is a calculation based on your traffic and the average email capture rate with X-Ray based on the conversion rate and average order value you can enter yourself in the left-hand form:
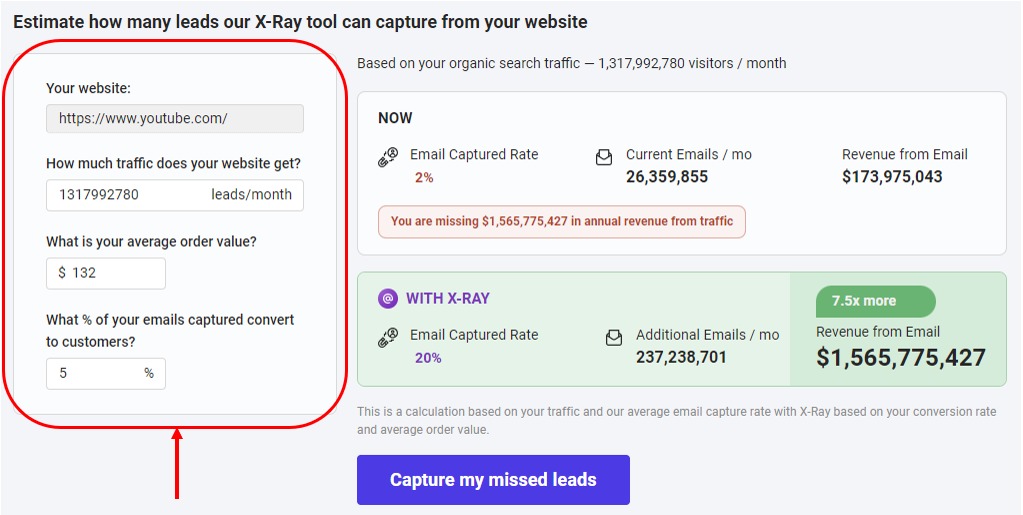
Leads per month, average order value and email conversion rate are manual fields that allow you to tell the tool more about your business. The app will automatically fill in the form for you, basing the estimated number of leads on your previous month’s traffic levels—you can edit this field if you have a more accurate figure. The values you enter here will determine the estimates provided for additional emails per month and the revenue you could gain from them on the right.
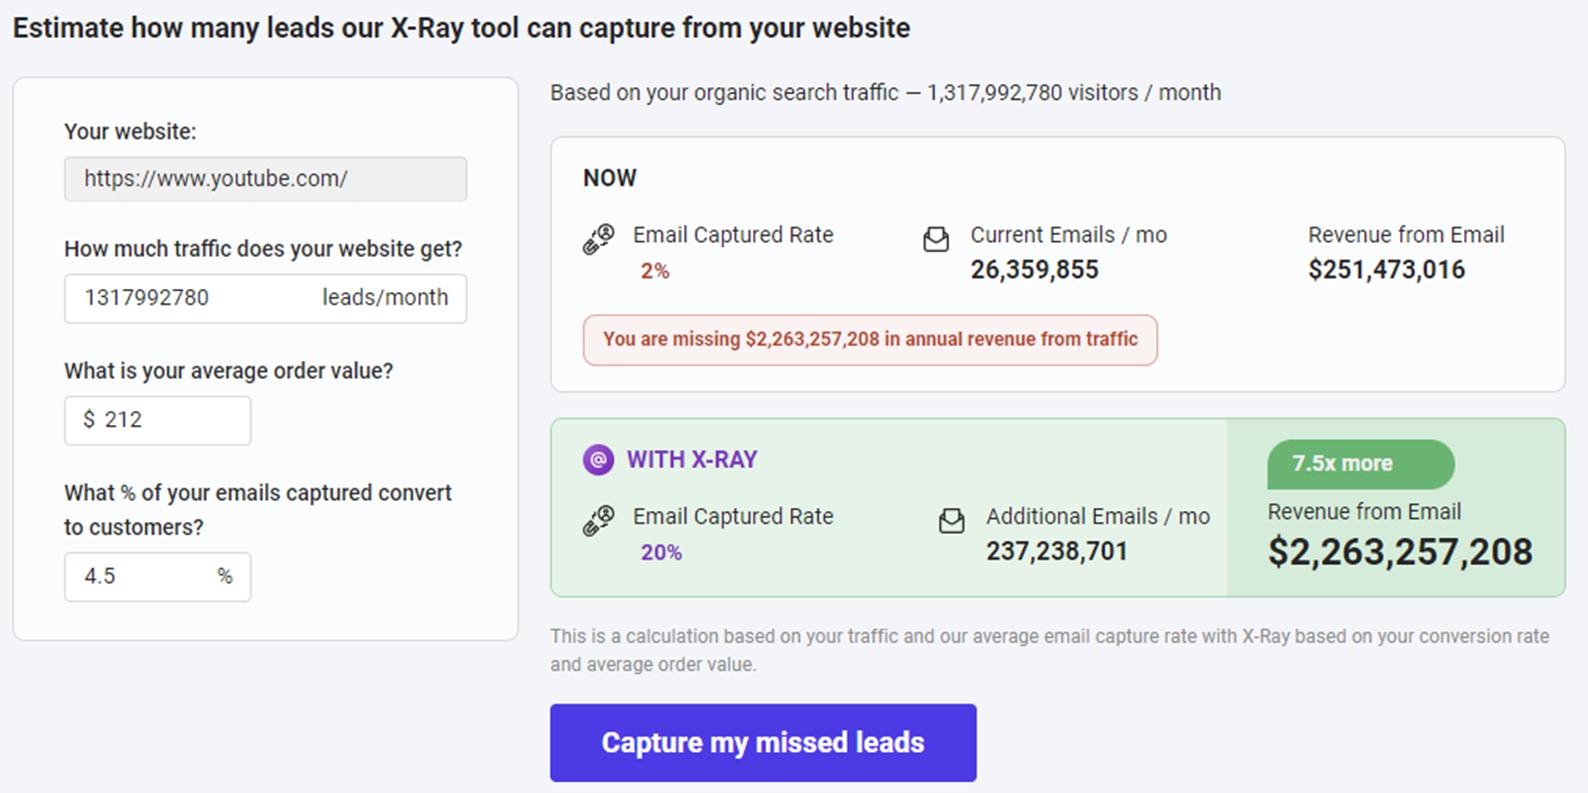
Click “Capture my missed leads” to proceed to the script installation.
Step 2: Install the code on your website
To start gathering leads using X-Ray, you need to add a line of code to the relevant pages on your website. You can follow the relevant installation guide for Google Tag Manager, WordPress, or Shopify here—these are located under the “Script Installation” tab.

To install the script manually, simply copy the code from the box and paste it immediately after the <head> tag on every page from which you want to start capturing contacts—for example, you might install it on high-intent pages where your subscription or pricing details are displayed.
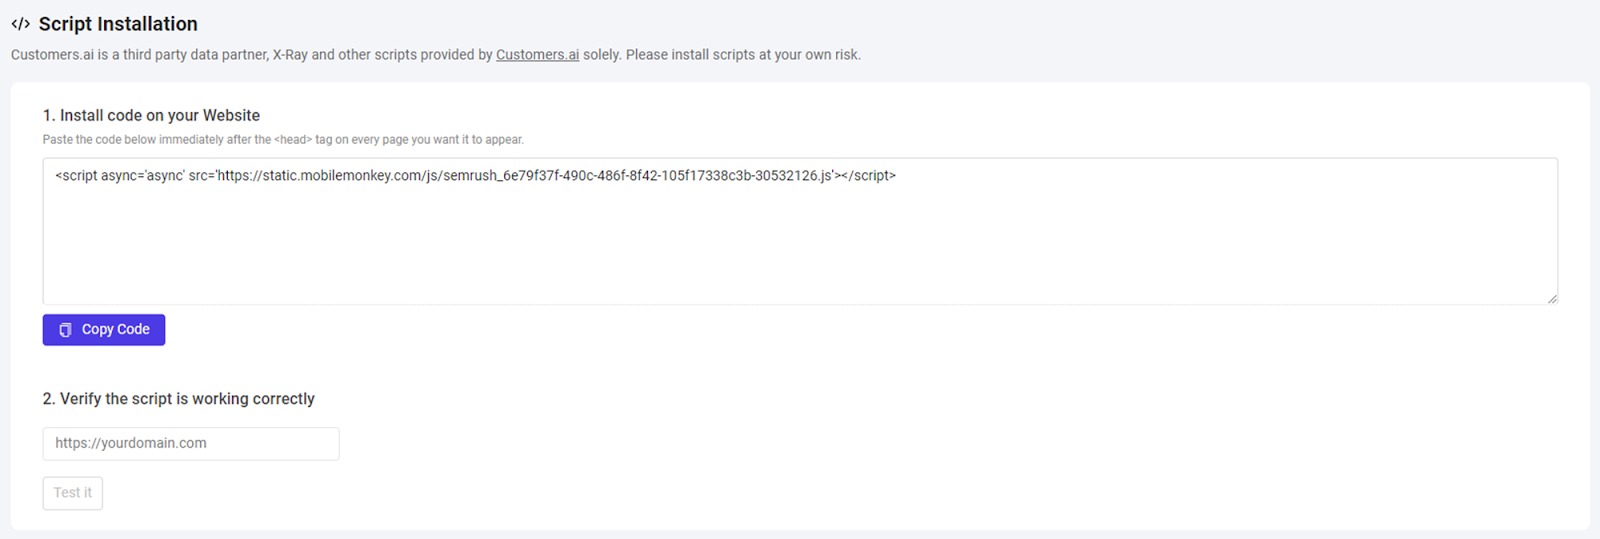
You can verify that the script is working as it should by entering the code in the box below 2. Verify the script is working correctly and clicking “Test it” to run diagnostics. You will then receive a diagnostic result based on your code.
If there is an error, it will appear in the report alongside a red cross and a question mark icon indicating what needs to be fixed. Simply hover over the latter to reveal the solution.
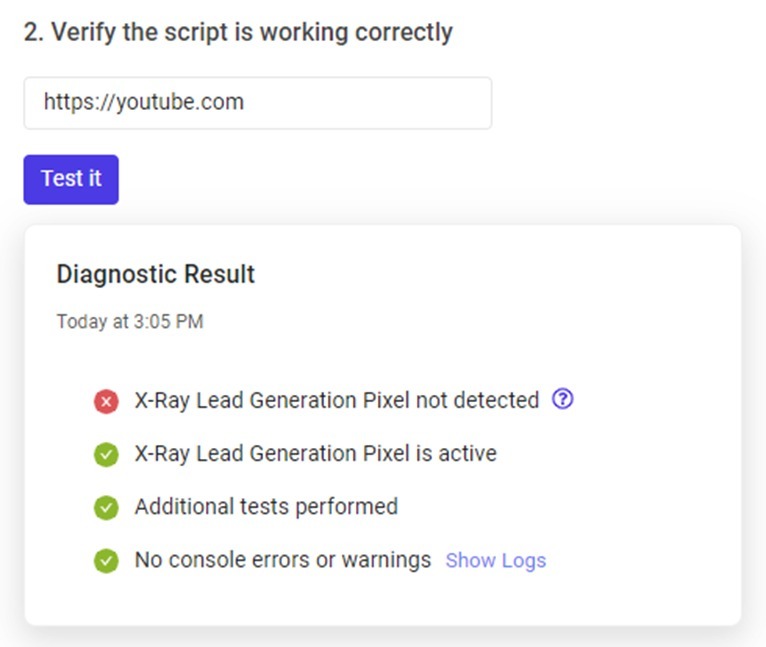
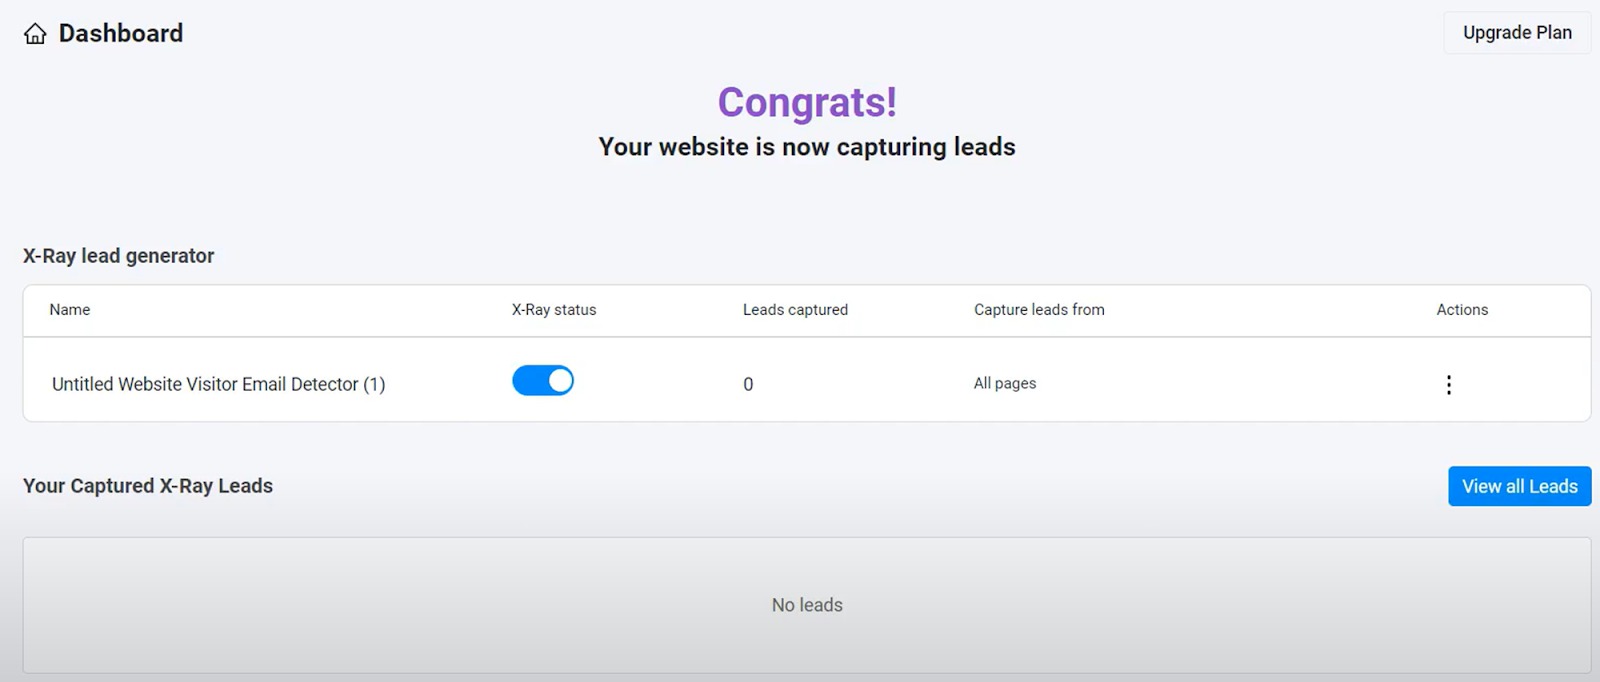
If everything is working as it should, you can return to the Dashboard to check that your website is capturing new leads—try refreshing the page if it does not show. All of the pages and domains you add the code to will be displayed under X-Ray lead generator here.
Step 3: Set up your integrations
You can then head to the “Integrations” tab to start sending your leads from the X-Ray app to your chosen destination.
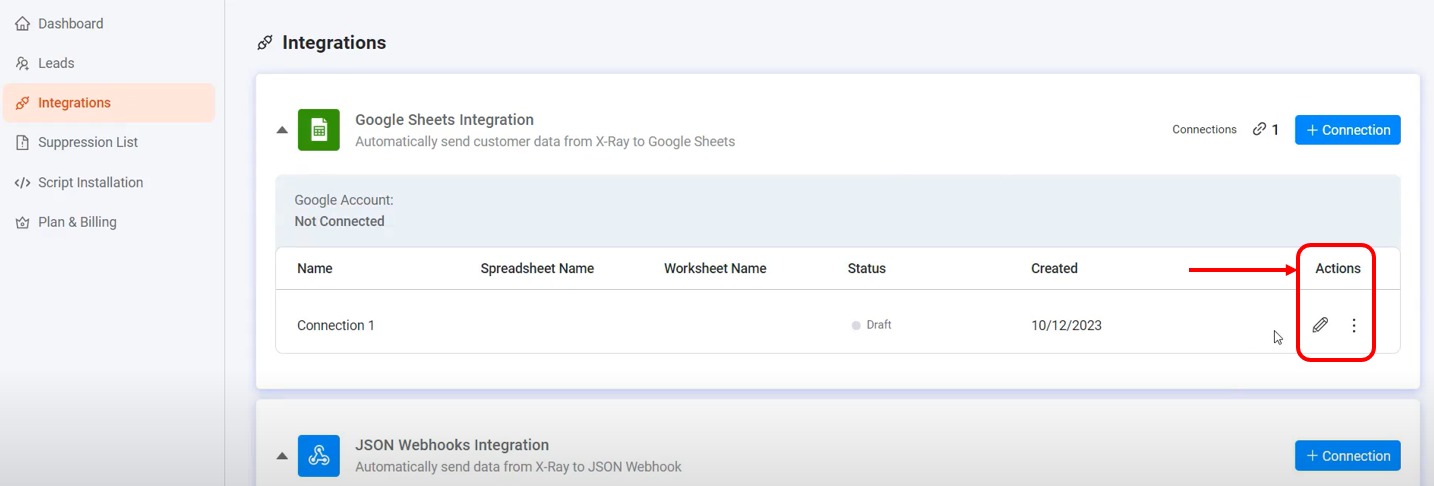
Let’s take Google Sheets integration as an example. Click ‘+ Connection’ and then the pencil icon to edit the integration.
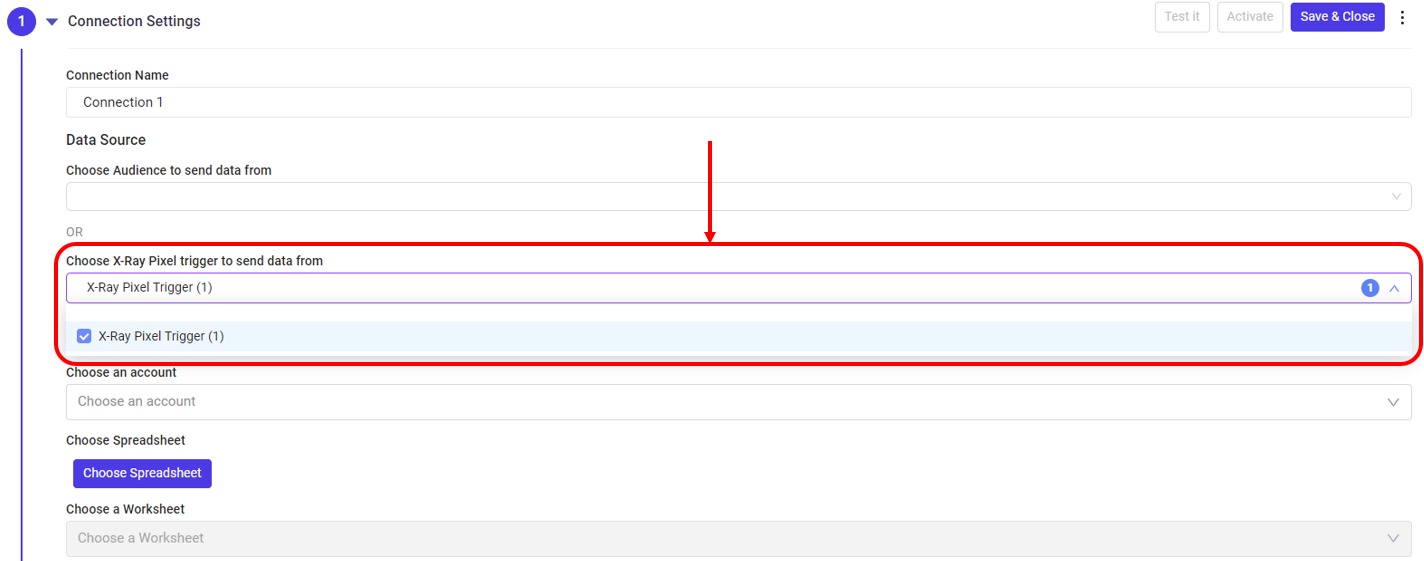
In ‘Connection Settings,’ you will then be able to set the connection name, and choose a data source from the audiences or the pages to which you added the script. Under Choose X-Ray Pixel trigger to send data from, select the one you want to start populating your spreadsheet.
You can add your Google account here via the ‘+ New account’ button under Choose an account, and then choose a spreadsheet from the ones detected in your account.

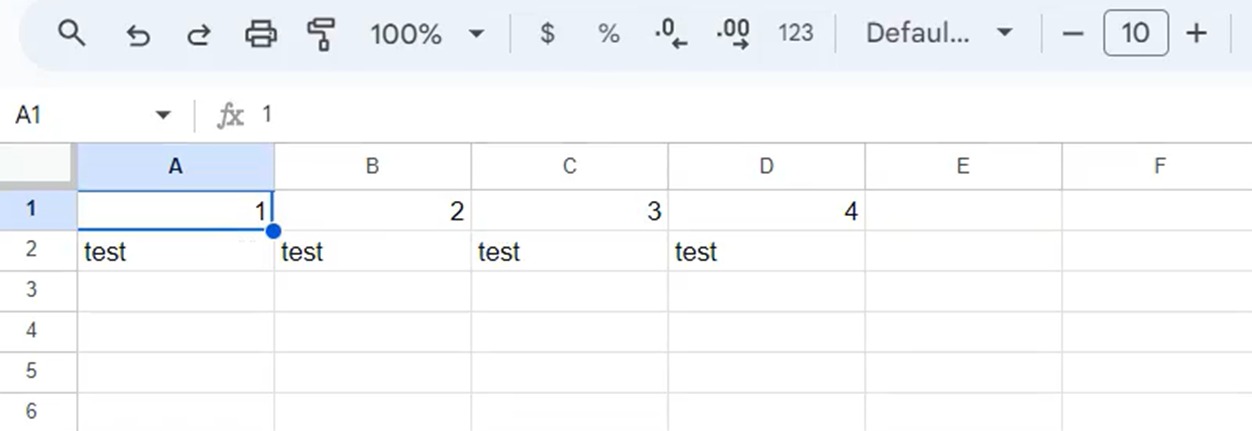
Under 2. Look up an existing row, you can determine lookup columns and values based on existing records to insert your X-Ray data where you want it (the example below uses a test spreadsheet with values 1-4 inserted in the columns):

Then, pick from the list of values in the drop-down menu:
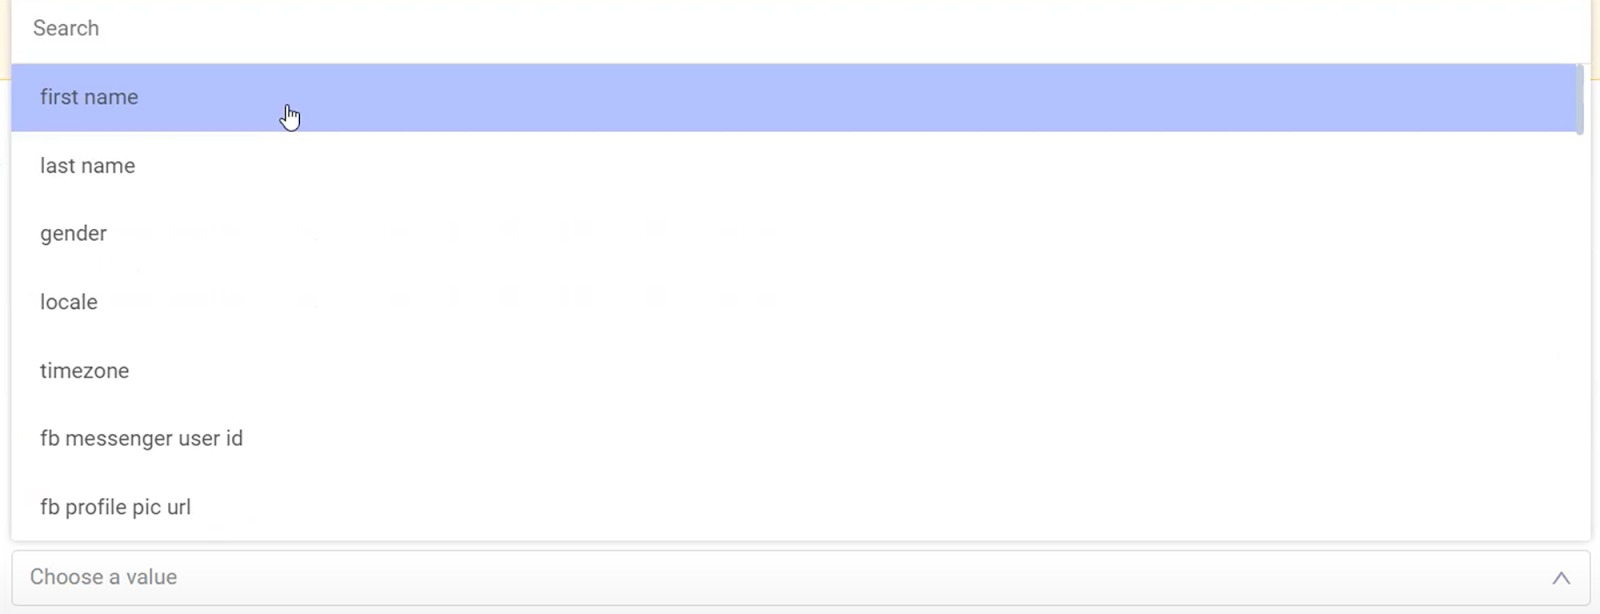
Under 3. Update row or create new row with attribute values, you can select the other attributes you want to apply to your lead generation:

Now you’re ready to test the integration and, once you’re happy it’s collecting the correct data, activate it. To check the integration, simply scroll up and click “Test it” to reveal a pop-up box. Clicking “Send” will then give you a confirmation in the upper right of the screen.

You can then head to your connected spreadsheet to check that it’s added the correct data points for your leads. If incoming leads are found to match any existing records in your spreadsheet, they will not be added.
To set up an integration with JSON Webhooks to send your data to any other site, head back to the “Integrations” tab, and click ‘+ Connection’.

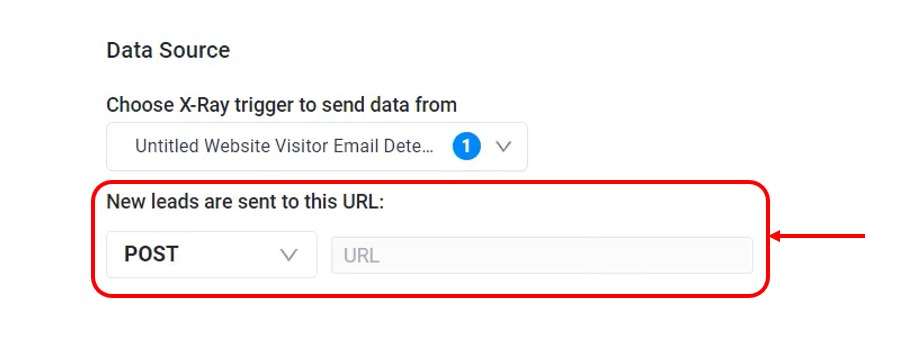
You can edit your connections via the pencil icon in the same way as the Google Sheets integration above. Select your trigger and input the URL you want to send your new leads to:
Under 2. Include attributes as form data, add a name for each one and the values you want to collect, and then check the integration via the “Test it” button above.
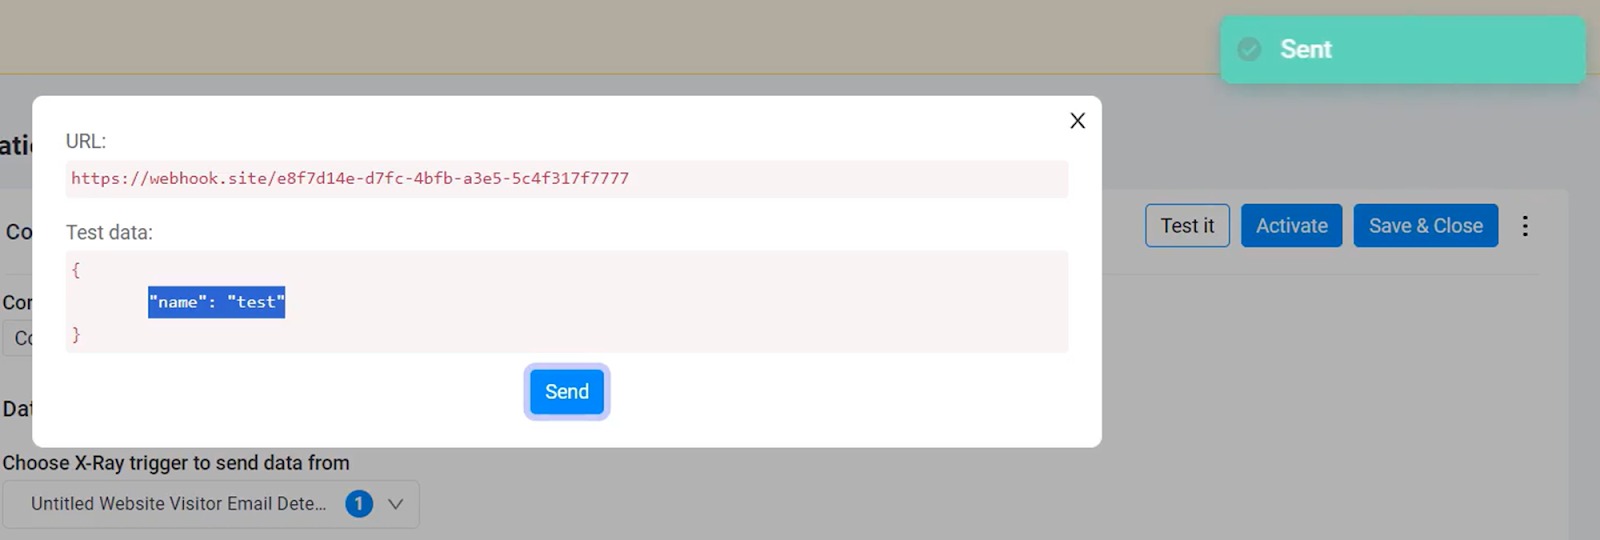
Check that the data point has appeared at your chosen URL to confirm that your integration is set up correctly.
Step 4: Set up your Suppression List
To define the contacts and domains you don’t want or need to engage with via email, you can use the Suppression List tool within the X-Ray app.
You can either add the emails or domain URLs manually in the left-hand box, or click “Upload CSV Manually” in the right-hand box to add a previously compiled list of contacts and/or websites.

For example, you can simply add “semrush.com” to suppress all leads that come from email addresses containing @semrush.com. There is no limit, and each new line item will be listed underneath these boxes with a corresponding trash can icon in case you need to delete anything.
Step 5: Manage your leads
Once X-Ray has started gathering leads from your website visitor data, they will be listed under the “Leads” tab.
Here, you will find details about each lead—the email, source, and date will always be provided. The name, address, and phone number of the visitor may also be provided, along with data about their on-page behaviors, such as clicks, scrolls, and time on site.

If you added your script to more than one website, you can filter your leads by domain to easily find out where they came from—this feature is especially useful if you’re using Website Visitor ID X-Ray Pixel as an agency.
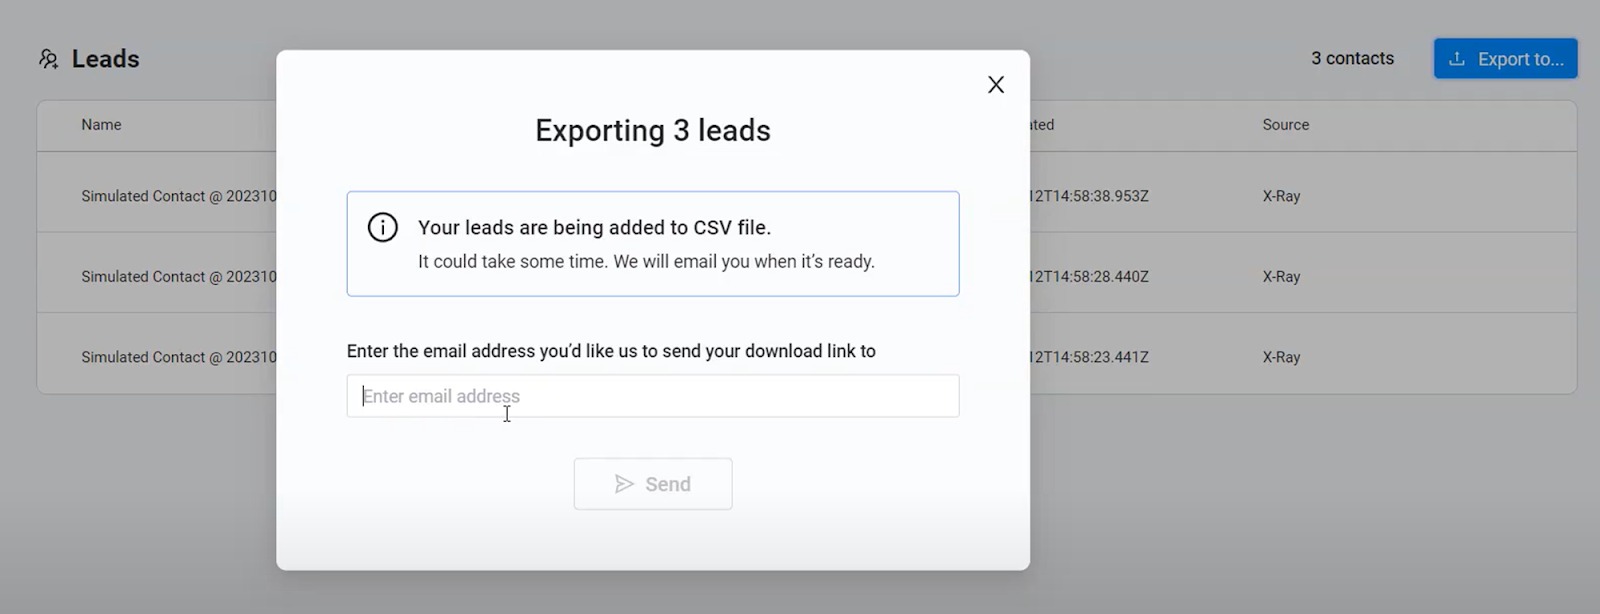
To export your leads, click on “Export to” in the upper right and enter the email address you want the app to send the download link to:
Plan & Billing
Under the “Plan & Billing” tab, you can manage your account and your lead limit, and purchase additional leads when required. Simply click “Buy more leads” to reveal the in-app purchase options:
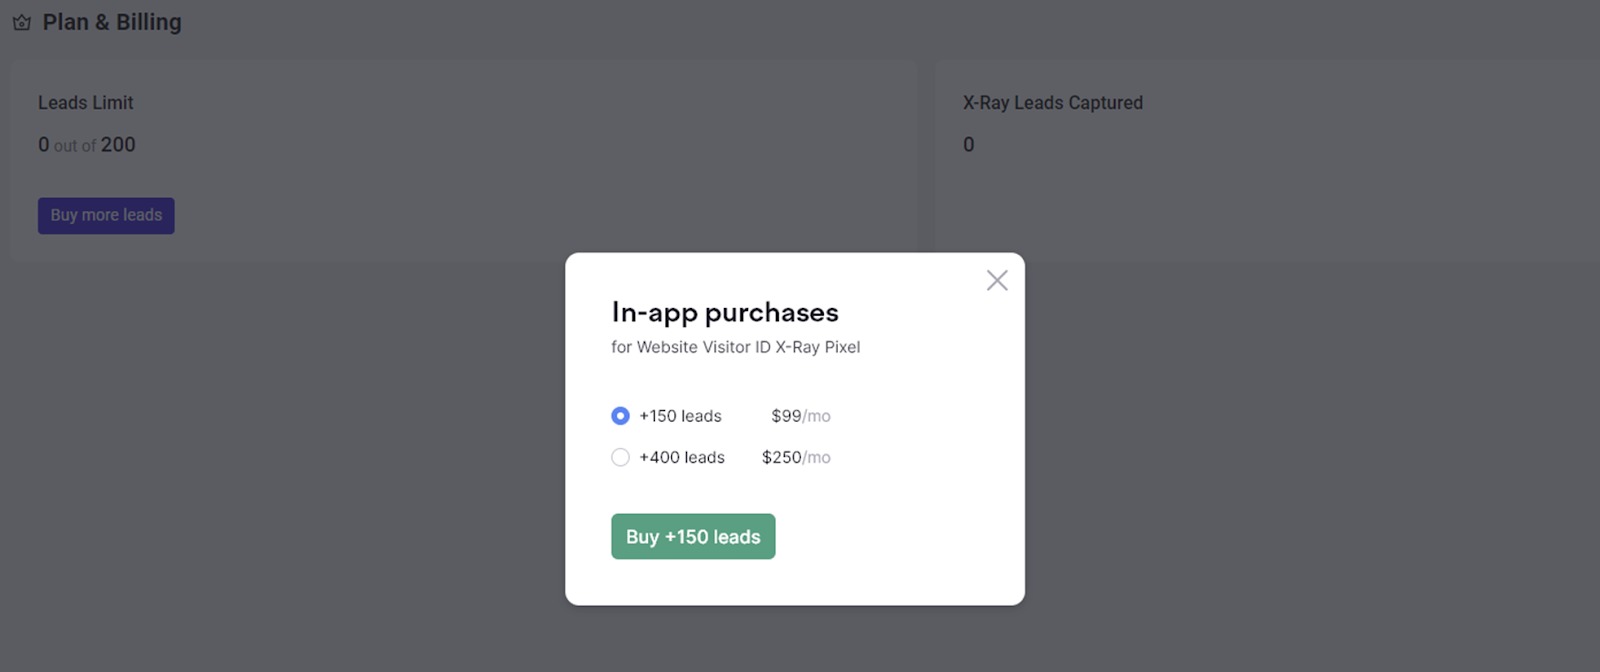
You get 50 free leads and the option to increase your lead limit by 150 or 400 at a time—this costs $99 or $250 respectively.